Brushes Held Like Hammers: Our recording engineer looks at ways to reduce spill without compromising a full–band tracking session.
When recording bands, some SOS readers seem to feel that their task is to eliminate spill at all cost, but this is frequently to the detriment of the music, in my view, because it usually involves musician–unfriendly tactics such as increasing the distance between the performers, isolating them from each other acoustically (necessitating headphone foldback), and/or recording them piecemeal via overdubbing. Neurotic ‘spillphobia’ is rarely good for your recorded sonics, either, because it encourages extreme close–miking (typically the enemy of representative timbres) and robs an ensemble recording of the benefits that judicious acoustic crosstalk can provide, namely fuller tones for each instrument and an automatic sense of ‘mix glue’ binding them all together.
I’m not dogmatic enough to suggest abandoning acoustic separation as a matter of principle, because it does have an important role to play in project–studio productions. I just think it’s too often used as an excuse for hampering musical communication or settling for underwhelming mic signals. With this in mind, I’ll use this month’s Session Notes to examine the mechanics of a full–band date I did recently, where we were able to get a workably low–spill result without disconnecting the musical ensemble or getting headphones involved.
Separation Anxiety
The group in question, Brushes Held Like Hammers (http://brushesheldlikehammers.bandcamp.com), already had a couple of self–produced albums behind them, but were hoping to upgrade their sound to something a bit more commercial. To this end, they had called on their friend Algis Juknevicius to help them with general production issues, while I handled the engineering of a three–day recording session at a small studio in the neighbourhood. The aim was to end up with completed backing tracks for six songs, so we decided to record everyone playing together to make best use of the available time — in other words, we’d track live drums, two electric guitars, and electric bass at the same time.
The studio facilities were fairly basic, in that there was scant acoustic treatment — it was more of a rehearsal room than a studio, to be honest, despite there being plenty of computer hardware and rack gear stacked about the place. The main recording room measured about 5 x 8 metres, with a smaller 3 x 5 metre room adjoining it, which we could use as a control room. A store room was also available as an isolation booth for guitar cabinets, but that would have required us to use headphone foldback, something I was loath to do unless separation in the main room was really a problem.
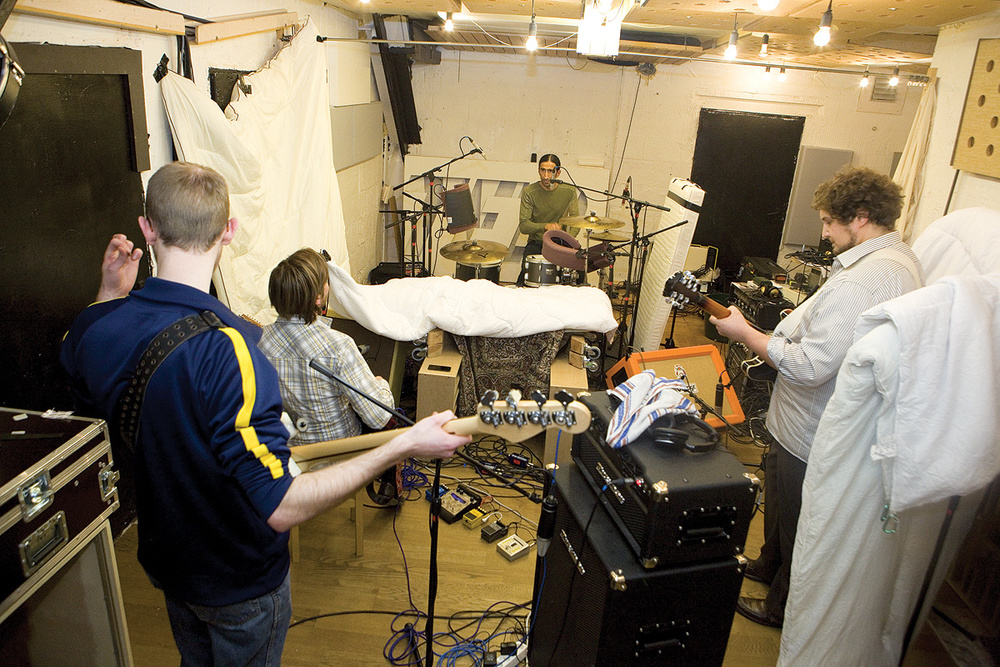
 The one–room setup for this session. Despite the close proximity of the instruments, spill was kept low by careful session layout, sensible use of mic polar patterns, and placement of a number of improvised acoustic absorbers.
A worry people have about recording rock bands in one room is that spill between the mics will make everything sound roomy and distant, but that really shouldn’t be a problem as long as you don’t try to combat the spill by moving the players away from each other. This may seem counterintuitive — surely you should get less spill the further apart you move the players, right? Strictly speaking, this is true, but moving the players apart often causes more problems than it solves because, in practice, it’s more the time–delay of the spill than the sheer amount of it that makes a mix sound washy. Keep the musicians close together, on the other hand, and all the mics in the rig pick up each instrument at fairly close range, almost like an elaborate multi–miking technique, so the spill combines with each instrument’s primary mic signals to give a more three–dimensional and life–like sound, rather than lingering on afterwards like reverb.
 Here you can see the drum miking in detail. Notice how the right–hand overhead mic is in the shadow of the cymbal as far as the hi–hat is concerned.So, even though the recording room was reasonably live–sounding (the only acoustic dampening was a handful of home–made panels on the eight–foot–high ceiling), I deliberately tried to position the instruments as close to each other as I could. The two guitar cabs were out in front of the kit, about two feet away from the kick drum (leaving just enough room for me to set up the drum mics), while the bass cab was centrally placed, as close to the drums as floor space (for guitarists/stompboxes) would allow — about seven feet away.
Setup Overview
Never having worked with this band before, I played things fairly safe with the mic setup. My goal was to aim for a complete kit sound in my stereo overheads, and then supplement that with stereo room mics and spot mics on the kick, snare, hat, ride, and both toms (the drummer only used two). However, I wanted to hedge my bets in case I needed to dry up the sound by relying on the sound of the close mics more, so planned to dual–mic both the snare and kick, submixing the two mics to a single track in each case so as to make more efficient use of my 16 available recorder inputs. For the guitars, I was happy to go for a close–miked sound, as much for sonic reasons as from any desire to reduce spill — listeners are now quite accustomed to this kind of sound on record, unnatural as it is. However, I did dual–mike both cabs to increase the chances of my getting a representative balance of each one’s qualities, because I find it’s quite difficult to avoid unnaturally overemphasising some small aspect of a loudspeaker’s character when you’ve got a single mic right up close.
Miking bass guitar is never an easy job in a budget one–room band–recording situation. Because high frequencies are more easily absorbed/deflected acoustically than low frequencies, it’s very easy for muddy–sounding spill to build up across all the mics in a full–band setup. The easiest solution to this is to restrict each mic’s low–frequency bandwidth with high–pass filtering — but of course that isn’t really an option for any mic on a bass instrument! A common workaround is therefore to take a DI signal from the instrument as well as miking its amp, so that you can high–pass filter the microphone signal while still retaining spill–free low–frequencies from the DI. This tactic also helps you work around the poorly controlled structural and acoustic resonances which usually compromise low–frequency response in project–studio recording spaces, because you can replace the mic signal’s low frequencies with the more reliable low end direct from the instrument. (It’s not just the low end of a bass DI that’s useful, though — the string character picked up by a DI can help a bass remain more audible against things like distorted guitars and drums, especially for end listeners with smaller playback systems.) I also recorded separate DI signals for both the guitars as an insurance measure, as it would allow me to re-amp them later if spill on the guitar mics caused insurmountable problems, or in case the band changed their minds about guitar tones post–recording.
Overheads, Kick & Snare
Whenever I’m recording a group of musicians together, I usually start getting sounds for whichever instrument mics are likely to pick up the most spill: in this case, the drum overheads. These were a pair of Shure KSM141s which I’d set to their cardioid polar pattern (to keep the sound fairly dry) in an ‘either side of the drummer’s head’ position. Although I can normally rely on this configuration providing a reasonably well–balanced mix of the kit elements, it really didn’t work on this occasion, partly because Mutlu, the drummer, had his hi–hat set quite high and wasn’t shy about hitting it, so the snare and cymbals sounded weak and distant by comparison. Unfortunately there wasn’t too much I felt I could do about this issue at source without upsetting Mutlu’s playing style, and there was no option to change hi–hats for thinner ones. I made a small improvement by setting up a mattress just to the side of the drum kit to soak up some of the hi–hat sound bouncing off the closest wall, but eventually I decided I needed to move the overheads into more of a ‘cymbal spot mics’ position over the kit, further away from the hi–hat’s strong horizontal plane of dispersion. While I was at it, I tried to position the closer overhead mic so that the hi–hat was acoustically shadowed by the cymbal on that side of the kit. The disadvantage of this was that it made the hi–hat appear to be located at the other side of the kit’s stereo image, but I felt this was a justifiable trade–off in return for a significant balance improvement, especially since I was pretty sure that the hi–hat close mic (and indeed hi–hat spill on the snare mic) would relocate the instrument more sensibly in the final mix.
 By building an impromptu ‘isolation tunnel’ over the kick–drum microphones, we were able to shield them from the worst of the upper–spectrum spill from the cymbals and electric guitars.
The two mics I was using for the kick drum were a Blue Kickball dynamic and an ADK S7 large–diaphragm condenser. I aimed the former mic at the beater contact spot through the resonant head’s small cutout, finding a nice chunky attack character a few inches in front of the drum, while the latter mic was a foot or so further out to capture the low–end weight. Once we were satisfied with their mixed sound, Algis and I isolated the kick–drum mics from the rest of the kit using a makeshift isolation ‘tunnel’ built from a couple of spare freestanding diffusers, a mattress, and some blankets. I regularly take this precaution when working with bands for the first time, because you never know quite how consistent the drummer’s footwork will be, and it’s easier to use compression to control wayward levels when there’s less spill.
 Off-cuts of acoustic foam were used around the snare and rack–tom mics to take the edge off cymbal, and particularly hi–hat, spill.
Managing separate stands for my two snare close mics (a Shure KSM137 small–diaphragm cardioid condenser and a Shure SM57 dynamic) proved rather awkward under the circumstances, so I set one mic up and gaffer-taped the other to that. Finding enough ‘meat’ in the sound involved lowering the drum’s tuning and then placing the mics a good nine inches away from it, so again we hedged our bets by wrapping an off-cut of acoustic foam around the sides of the little mic ‘cluster’ to mitigate the inevitable hi–hat spill.
Toms, Hat, Ride, & Room
Getting a decent rack–tom timbre was made easier by the fact that its tone in the overheads was already nice and full, so I only really needed the close mic in there for a little extra definition. The Superlux Pro 228A I was using for it is fairly cheap and cheerful, but managed a presentable enough sound very quickly from about five inches away. The spill it was picking up from the cymbals was nasty–sounding, though, so another foam off-cut was applied to smooth this off. The same mic sounded pretty horrible on the floor tom, however, and a Pro 218A from the same drum–miking set was even worse: all stick and no ‘girth’. So I decided to swap in an AKG C414B–XLS large–diaphragm condenser for richer low end, and by selecting a figure–eight polar pattern and placing it horizontally over the tom, I was also able to reject spill from the hi–hat and cymbals quite effectively.
I’d put Avantone CK1 cardioid condensers on the hi–hat and ride cymbal, and took a little time to refine their initial positions to achieve a useful mid-range tone (offsetting the sizzle coming in as spill from other mics) and to balance the needs of both the stick–work and the sustain components. While spill on the hi–hat mic was clearly not a huge concern, the spill from other cymbals on the ride mic was more of an issue, so I decided to try out a little experiment I’d been hatching. There are a lot of off–the–shelf mic baffles available these days (the most well–known being SE Electronics’ Reflexion Filter range), but I’ve always wondered whether you might be able to bodge together something reasonably effective as a DIY project for a lot less money. With that in mind, I’d found an old plastic bucket, sawed a half–pipe section out of it, and stuck a bit of acoustic foam on the inside. Mounting this to a spare mic stand allowed me to position the concave foam–covered surface around the mic, and I was gratified to hear that it did seem to take a useful edge off the spill.
However, it wasn’t without some cost in terms of the sound of the ride itself, which became a little cloudier into the bargain, presumably because residual unabsorbed reflections from the plastic surface were causing phase–cancellation effects at the mic diaphragm. On balance, though, it seemed like a positive step, so I left the home–made baffle in place. What I didn’t notice at the time, however, was that the baffle had also impacted on the sound of the nearby floor–tom mic, overlaying a rather unpleasant high–frequency comb–filtering–related ‘whistle’ onto the cymbal spill it was picking up, a problem that only struck me when I listened back to the files at home following the session. It’s safe to say that I probably won’t be trying that particular stunt again...
 An improvised baffle made from half a plastic bucket lined with acoustic foam helped reduce hi–hat spill into the ride–cymbal mic, but at the expense of introducing nasty comb–filtering side–effects for the floor–tom mic’s cymbals spill.
The room mics were the final piece in the drum-kit setup puzzle. I knew that these would pick up everything in the room to an extent, but I wanted them to catch more ambience from the drums in this case, so that the kit would sit a little behind the other instruments in the depth perspective. For this reason I placed the mics behind the kit. The mics I used were a pair of cheap AKG CBL99 boundary mics, and the good thing about this kind of mic for ambient pickup in small rooms is that you effectively remove one of the walls from the equation — the mic doesn’t ‘see’ any reflections from the surface it’s mounted on, which weakens comb–filtering and room–mode-related colorations on your recording. I initially placed the boundary mics on the rear wall, but that was a non-starter, because they’re brighter on axis (ie. perpendicular to the surface they’re mounted on) and that was giving me way too much of the cymbals. Locating the mics on the floor gave a much more representative balance of the kit as a whole, although again with rather too much hi–hat level on the closer of the two. This was something that I initially resigned myself to addressing with EQ, but later in the session I was able to make a substantial improvement here by propping up another small folding mattress behind the drummer to block the direct sound path between the hi–hat and the closer room mic.
Bass & Guitars
The Groove Tubes GT57 large–diaphragm condenser mic I’d selected gave me the warm amp sound I was hoping for, sensibly complementing the ‘wirier’ DI signal. The main floor–to–ceiling room resonance was giving an unrepresentative boost around 70Hz, which made the balance of some of the low notes inconsistent, but I was content to rely on the DI signal for low–frequency consistency. Putting the mic at a different height might have helped, but I liked the sound I was getting from a specific speaker cone in the cabinet and we didn’t have any platform robust enough to lift the bass cab onto, so I chose the lesser of the evils: an overall tone I wanted, but with some processing work required at the low end. By not firing the bass cab or its close mic directly at the drums, I was able to keep spill levels across the bass and drum mics pretty low.
 Although the bass-cab mic position gave a desirable mid-range tone, the room’s resonance modes caused problems with the low consistency, so we recorded a DI signal to work around this.
I wasn’t anticipating many problems with spill onto the guitar close mics, because I was planning to go for a typical ‘up by the grille cloth’ rock sound, and the cabinets were both set up with their backs to the kit, such that they were physically shielding the mics in front of them. Indeed, once I’d worked up a mix of each of the dual–mic setups (a Shure SM57 and a Groove Tubes GT55 on one amp; another GT55 with a vintage Sennheiser MD421 on the other) the spill levels were promisingly low even without any additional baffling, so I immediately discounted the idea of isolating the cabs into the store room. However, I did rig up a couple of duvets on the walls beside each guitar cabinet to round off the tone of the guitar spill being reflected into the drum overheads, and also placed a duvet across the top of one of the guitar amps because the off–axis frequency response of its condenser mic was making the ride cymbal, in particular, sound undesirably abrasive.
Musician–friendly Spill Reduction
After all that, then, how good was the separation between the instruments? Well, the best way to answer that question for yourself is by checking out the audio examples from this session, (see the Audio Examples box for details). However, let me also put it into practical terms...
We were completely free to drop in replacement sections on any individual performer’s live take, without any appreciable conflict between residual spill and after–the–fact overdub.
We could have silenced the drums utterly at any point by re-amping the guitar parts, and we would have had no problems muting the bass and/or guitar parts in pretty much any situation where the drums weren’t playing completely on their own. (We recorded multi-track drum and cymbal samples at the end of the session too, which gave additional flexibility in this regard.)
We were at liberty to totally reinvent the bass or guitar sounds via re-amping, and even if we’d decided to change the sound of the drums quite drastically with mixdown processing, it would have had negligible effect on the tone of the electric instruments.
In other words, our recording session left us with all the mixdown and overdubbing flexibility we were ever likely to need. Crucially, however, this hadn’t been achieved by inconveniencing the musicians, who could still perform as a close–knit unit and interact naturally during and between takes, without all the malarkey of headphone monitoring, talkback systems, and click tracks getting in the way.
Polarity Checks
Wherever you get spill between mics, there’s a potential for phase–interaction between the mic signals, resulting in comb–filtering effects. This can be disastrous for your sonics, but it doesn’t have to be. The easiest way to avoid major setbacks is to get into the habit of checking for the best–sounding polarity setting for each and every mic you set up. On this specific session, that meant flipping polarity switches on numerous occasions: when mixing the kick, snare, and guitar mic pairs together; when adding in the kick, snare, hat, ride, tom and room mics to the overheads; and when combining the bass and electric–guitar mics with the drum setup. (The bass DI and mic signals needed checking against each other too.) What’s vital to remember when doing this, though, is that you mustn’t just listen to the sound of the instrument whose mic you’re adding in, because the phase–interaction between it and other mics may actually affect the sound of any other instrument too.
Regrets, I’ve Had A Few...
While I was content with the way things came out, there were, as usual, a few things I might have done differently given a second shot. The hi–hat spill over the other drum mics was my biggest complaint, and with hindsight I think it may have been worth miking beneath the snare, as the drum’s acoustic shadow would have worked in my favour. Miking a snare just from underneath isn’t unheard of, by any means — Bruce Botnick did this when working with the Doors, for instance. The main thing is not to focus the mic too closely on the snare wires, and to take care with the phase relationship between the snare and kick mics, given the increased kick spill. Another tactic I could have tried was putting both the overhead microphones into the acoustic shadow of one of the cymbals, In order to reduce reflected spill from the guitars being picked up through the drum overhead mics, we used duvets to cover the walls beside each guitarist — here they’re draped over a spare mic stand to hold them in place.
 Although the guitar mics were placed close enough to the speakers that they didn’t pick up a tremendous amount of spill, the condenser mic on this amp gave what cymbal spill remained an unpleasantly harsh tone. The additional duvet draped across the top of the cab helped remedy this. using a coincident or near–coincident stereo configuration.
My other mistake was neglecting to properly phase–align the two snare mics by ear before taping them together — in the heat of the moment I just lined them up by eye, which proved not to be too smart. The result was that the two mic signals were offset by around a 10th of a millisecond, and although this wasn’t enough to impact on the drum’s mid-range tone, it did rob me of some useful ‘snap’ at the high end. The way to find the best phase match between two mics is to flip the polarity of one of them and then slowly move them relative to each other until you find the weakest mixed sound. Resetting the polarity switch should then give you the most solid sonic combination. If you’re not keen on spending time doing this during the session, you can always set up the mics in front of a portable radio beforehand to find the proper phase match, and then tape them together (or mark their alignment with masking tape) so you can rely on it later. Which is what I should have done!
Audio Examples
You can find a wealth of audio examples taken from this month’s recording session on the SOS web site.
Session Notes: Brushes Held Like Hammers Audio Files
The audio files available on this page accompany my article in SOS about recording the indie band Brushes Held Like Hammers. The first set of files comprise a section of the complete live multi-track recording which you can import into your own DAW and try mixing for yourself, if you like. The filenames are fairly self–explanatory, but here are some additional notes to describe exactly what you’re hearing in each case:
RawTracks01_Kick
The kick drum was recorded with two mics in front of the drum, with a makeshift isolation ‘tunnel’ built around them both to reject spill from other instruments. The closer mic was a Blue Kickball phantom–powered dynamic model, set up a few inches outside the hole in the drum’s resonant head and with its low–frequency switch set for minimum emphasis so that it would provide a good solid attack. An ADK S7 large–diaphragm condenser was placed a little further away with its 18dB pad switch in, providing low–frequency extension and tonal warmth. The two mics were mixed to a single recorder track.
RawTracks02_Snare
The snare drum was also recorded with two mics, this time a Shure SM57 dynamic and a Shure KSM137 small–diaphragm condenser gaffer–taped together about nine inches from the instrument. An offcut of acoustic foam was wrapped around the sides of the mics to take the edge off the hi–hat spill, but as you can hear from 0:40 onwards there’s still plenty of that!
RawTracks03_HiHat
There was so much hi–hat spill on the other drum mics that I concentrated on trying to capture more mid-range body from the instrument with its close mic. There’s still more sizzle than I wanted, but that was easy to remove with a low–pass filter for monitoring and mixing purposes.
RawTracks04_Ride
This file is the ride–cymbal mic, although the instrument isn’t being played in this particular excerpt. However, the spill on this mic nonetheless contributes to the overall drumkit sound, so I’ve still provided it here so you’re able to experiment with mixing the entire multitrack take for yourself if you wish. (To hear what this mic sounded like with the ride cymbal playing, check out the BucketBaffle02_RideWith audio file.)
RawTracks05_Overheads
These are the Shure KSM141 overheads, which were set up in a spaced configuration about three feet apart over the kit. Given the super–loud hi–hat, I set up the closer overhead mic in the acoustic shadow of one of the cymbals, which helped in terms of the balance, but also made the hi–hat appear to be coming from the opposite side of the kit. (The overheads were panned for an ‘audience perspective’ stereo image, so the hi–hat should have been on the right.)
RawTracks06_RoomMics
The room mics were a pair of inexpensive AKG CBL99 boundary microphones laid on the floor behind the drummer about six feet apart. As you can hear at 0:40, the hi–hat is again over-prominent in the balance (as it was in the room). Later in the session I tackled this with some further baffling, as you can hear in the MattressBaffle02_RoomWith example file.
RawTracks07_RackTom
This is the mic over the single rack tom, a super–budget Superlux Pro 228 dynamic mic. The first thing to realise is that the spill is comparatively benign tonally, partly because I’d wrapped an off-cut of acoustic foam around the mic to take the edge off the cymbal spill, especially from the hi–hat. You can hear the instrument itself playing from 0:28.
RawTracks08_FloorTom
Here’s what the floor tom close–mic, an AKG C414B–XLS large–diaphragm condenser, sounded like in the raw. I’d switched it to figure–of-eight mode to reject cymbal spill, but what spill remains hasn’t been helped by comb–filtering effects caused by sonic reflections from the ride cymbal mic’s nearby improvised baffle. For a clearer demonstration of this, check out the BucketBaffle example files.
RawTracks09_BassAmp
The bass amp was miked with a Groove Tubes GT55 large–diaphragm condenser mic switched to its cardioid polar pattern and placed a couple of inches from the grille cloth over the best–sounding speaker. As you can hear from 0:28 onwards, there was an appreciable room resonance between the floor and ceiling at around 70Hz, and this caused the fundamental frequencies of certain notes to be overplayed in the balance. Besides this, though, I was happy with the fairly warm–sounding amp tone as a complement to the DI signal.
RawTracks10_BassDI
This bass DI signal was taken from the DI output on the player’s amplifier, rather than from a separate direct box. Although the low end is less strong than that of the miked signal, the low frequencies are nonetheless much more consistent, so I ended up using those in the mix, together with some low EQ boost to bring them up in the balance.
RawTracks11_GtrAmp1
This is the combined signal from the first guitar cab’s two close–placed mics: a Groove Tubes GT55 large–diaphragm cardioid condenser and a vintage Sennheiser MD421 dynamic.
RawTracks12_GtrAmp2
The second guitar amp also had two close mics on it: another Groove Tubes GT55 large–diaphragm cardioid condenser and a Shure SM57 dynamic mic.
The remaining files demonstrate the effects of some of the baffling tactics I mention in the article. For all of these examples I asked the band to play the same song section several times, so that I could move baffling materials around between takes.
FoamBaffle01_RackTomWithout
In this audio example, you can hear how much cymbal spill was coming down the rack–tom mic without any baffling in place.
FoamBaffle02_RackTomWith
With an offcut of acoustic foam wrapped around the rack–tom mic, the cymbal spill was significantly reduced. Compare with the FoamBaffle01_RackTomWithout file.
BucketBaffle01_RideWithout
This is what the ride–cymbal mic sounded like without any baffling. Notice how the ride cymbal itself is more aggressive, as is the spill from the other kit components.
BucketBaffle02_RideWith
Here’s how the sound was altered by adding in my improvised mic baffle constructed of half a bucket and some acoustic foam. Overall, the spill feels less prominent, but the ride–cymbal sound has also suffered, becoming less open and a little boxy. On balance, I decided during the session that this seemed an acceptably compromise.
BucketBaffle03_FloorTomWithout
What I didn’t notice during the session was that reflections from the back of my DIY ‘bucket baffle’ had impacted on the sound of the nearby floor tom mic. Here’s what that mic sounded like before the baffle was added. Now compare this with BucketBaffle04_FloorTomWith
BucketBaffle04_FloorTomWith
The DIY ‘bucket baffle’ I used for the ride–cymbal mic negatively affected the sound of the cymbal spill in the nearby floor time mic, as you can hear in this audio example. Check out the section from 0:37, for instance, where a nasty 3.5kHz resonance has developed which wasn’t audible before the baffle wa introduced — check out the BucketBaffle03_FloorTomWithout file for a direct comparison.
DuvetBaffles01_OverheadsWith
This is what the drum overhead microphones sounded like during the recording session. Duvets had been placed on the walls adjacent to each of the electric guitarists to inhibit their sonic reflections from reaching the drum mics.
DuvetBaffles02_OverheadsWithout
If you compare this audio example with DuvetBaffles01_OverheadsWith you’ll hear how much difference it made when I hung up the duvets in the recording room, as described in the magazine article.
DuvetBaffles03_GtrGT55With
The duvet baffles weren’t just preventing guitar spill from getting onto the drum mics, but were also trying to reduce the drum spill being picked up this guitar mic. To hear how effective this was, compare this audio example (which uses the baffled recording setup) with the DuvetBaffles03_GtrGT55With demonstration file.
DuvetBaffles04_GtrGT55Without
When the duvet baffles are removed from around the guitars, the degree of cymbal spill immediately rises to a much higher level, and with a more audible tone too.
MattressBaffle01_RoomWithout
For the first day’s recording the room mics were picking up too much hi–hat on the right–hand mic (when seen from audience perspective). Although I was sure I’d be able to deal with that at mixdown, I still wasn’t that happy about leaving things that way, so I tweaked the setup for the second day to improve matters.
MattressBaffle02_RoomWith
By using a small fold–up mattress to obstruct the sightline between the right–hand room mic and the hi–hat, I was able to achieve a substantial improvement in the room balance. Compare this example with the MattressBaffle01_RoomWithout file and listen for how much less hi–hat you can hear.
For my final set of audio examples, I’d like to demonstrate just how much separation we were able to achieve on this session without splitting up or isolating the performers:
Spill01_RoughBalance
Here’s a rough balance of the live multitracks you’ve already examined in the RawTracks audio examples. Processing is very minimal: high–pass filtering pretty much across the board to avoid a build–up of muddy low–midrange spill; some low–pass filtering on tracks which had picked up too much hi–hat spill, and a bit of gating on the snare close mic from 0:40 for similar reasons; some compression on the snare, drums buss, and master buss; and a half–dozen EQ bands scattered around elsewhere. No send effects have been used at all — any room sound you’re hearing is from the recordings themselves.
Spill02_DrumsSolo
Here’s what the mix in the Spill01_RoughBalance file sounds like if you mute the bass and guitar mics. While you can still clearly tell that this is a live take, few people would guess that the guitar cabs were in fact only a couple of feet from the kick drum! In practice, this means that we could have completely rerecorded the electric instruments if we hadn’t liked the performances without any problems.
Spill03_BassSolo
Here’s the bass part from the Spill01_RoughBalance audio file. Although the cab is only about 6–7 feet from the guitar cabs and kick drum, the level of spill is extremely low, partly on account of the spill–less DI signal that’s mixed with the on–cab mic signal.
Spill04_GtrsSolo
Although I used no DI signal for either of the guitars in the Spill01_RoughBalance audio example, you can hear that their two dual–mic recording rigs still don’t pick up any spill from the bass, and only very little from the drumkit — mostly cymbal spill.
Spill05_FinalMix
And here’s the same section of the final release, as mixed by Algis Juknevicius. Notice how he’s been able to create a very different bass sound for the opening section, even though all the backing instruments were performed together in the single room.