Offering both retro analogue simplicity and modern digital recording facilities, can this device be master of all trades?
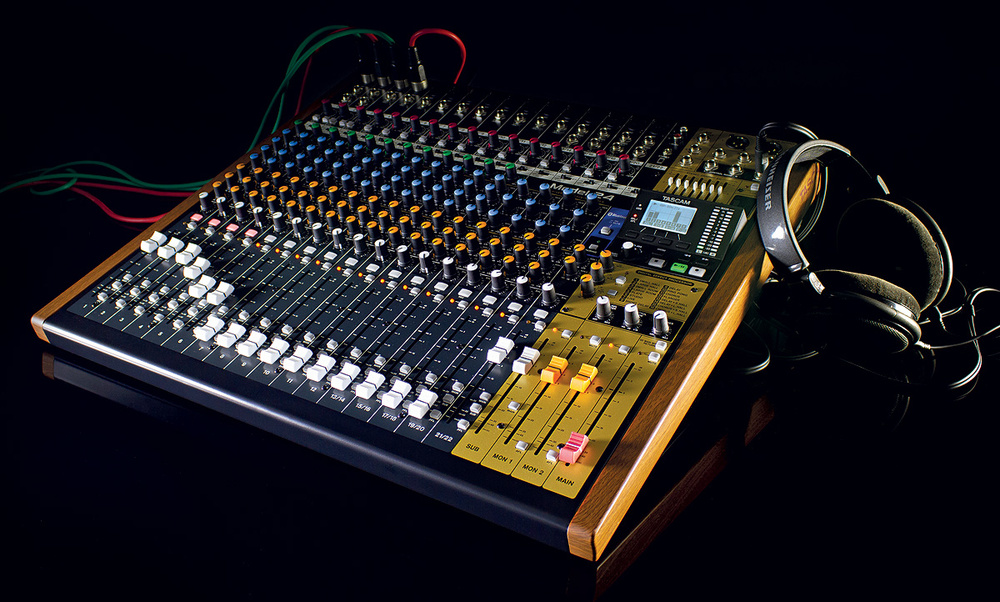
With its striking colour scheme, long-throw faders, faux-wood metal end-cheeks, and spacious layout, the Model 24 evokes memories of a time in which every function had a dedicated control and confusing nested digital menus were a rarity. Now, I don't plan on ditching my DAW software any time soon — but I was certainly keen to discover how much of that old, simpler approach to recording Tascam's Model 24 could bring back to my studio. I was also interested to find out how it might meet the needs of location recordists or those capturing live recordings of gigging bands.
Overview
Unlike some other all-in-one products, the Model 24 is arguably best thought of first and foremost as an analogue mixer — but one with a multitrack recorder built in, and one that doubles up as a 16-mic preamp, 22-input USB 2.0 audio interface.
The integrated multitrack digital recorder is the headline feature, and by today's standards it is fairly basic — though I believe that's deliberate. You can record, playback, punch in (with a pre-roll if you wish), choose your song sample rate/word length and edit song names. And that's pretty much it. There are no editing tools and there's no virtual takes facility, or anything like that. Crucially, though, the individual track-arming means you have the option of recording a full 22-track project all at once or building it up only one or two parts at a time. That's something you can't do when partnering another mixer with one of the latest generation of stand‑alone multitrack recorders from, for example, Cymatic Audio or Allen & Heath, since these devices record to all tracks simultaneously (or, at best, in two passes, each writing to half the tracks). For individual track-arming in such a setup, you'd need either a computer or a more upmarket device such as a JoeCo Black Box Recorder. In fact, the only current product I'm aware of that offers this facility and a similar number of channels for around the same price is the Zoom LiveTrak L‑20. That, though, is a rather different product that I'll discuss towards the end of this review.
What the Model 24 isn't is a direct replacement for the do-everything stand‑alone digital Portastudio that Tascam and others have being making and refining for the last couple of decades. Some may lament that fact, but I think it's a very sensible design decision. To have turned this into a full bells-and-whistles digital studio would have added considerably to the unit's complexity, putting off as many people as it pleased. It would also have bumped up the asking price significantly! As it is, the Model 24 offers you enough built-in recording facilities that you can be liberated from the computer when recording or songwriting. And when you've captured the parts, you have the option of using the multitracker to play back your recordings and create a basic analogue mix, or hooking up to your computer via USB for more demanding file management, editing and mixing tasks. Let's face it, even free DAW software offers way more power than any stand‑alone digital recorder can.
22 Into 17
 The first two channels offer high-impedance instrument inputs and insert points, while both of these and the following 10 channels also boast a one-knob analogue compressor, as well as the analogue three-band swept-mid EQ.The best way to get your head around the Model 24 is first to consider how it operates as a mixer. It's billed as having 22 analogue inputs (the other two of the 24 recordable tracks being the main stereo mix's L and R channels), but these are arranged over 17 channel strips, each of which has an input source selector (for the analogue inputs, and for the USB and multitracker playback). The first two strips are mono mic/line/instrument channels with a balanced XLR mic input, a switchable TRS jack balanced line/instrument input, and a TRS jack insert send/return point. As with all connections other than the USB socket and IEC power inlet for the built-in PSU (both on the rear), these are mounted on the top panel. The next 10 channels are the same, except that they lack the high-impedance instrument input option and the insert point.
Each of the first 12 channels also boasts a one-knob analogue compressor and a three-band (high/low shelf and swept-mid) EQ — there's up to ±15dB of gain per band for all of the channel EQs. The compressor and EQ can be set to have no effect, but they're always in the signal path. Note that the A-D/D-A converter lies between the compressor and EQ in the signal path so any compression is 'printed to tape', but the EQ isn't. Three aux send controls follow, the first two being pre-fader (for cue mixes), and the last a post-fader send for the digital effects engine and, in parallel, the balanced mono-jack FX output. Post the aux sends, the signal reaches the mute switch, the channel fader and the pan pot. Adjacent to the fader are buttons to route the signal to one or more of three busses — Main (the stereo mix bus), Sub (a stereo group bus) and PFL (which sends the pre-fader signal to a solo bus).
 All tracks have a slide-switch to select the input source — the analogue input, or the return from the multitrack recorder or from a computer connected via USB. In the MTR position, you can monitor the analogue input while tracking, and the multitrack return on playback.The next four input channels cater for both balanced mono mic/line signals (using the XLR or L/mono jack respectively) and balanced stereo line signals (both jacks). These channels lack the compressor, and the EQ is simpler, with a fixed 2.5kHz mid band.
The first 16 channel strips have a 100Hz high-pass filter switch, and a signal-present LED (which glows green from -56dB, and red at -3dB to warn of clipping) next to the gain knob. The only other analogue metering, other than the main mix meter, is an LED for each compressor, which glows brighter to indicate more gain reduction. More detailed digital metering of the various input sources is available on-screen.
The last stereo channel, 21‑22, would once have been called a 'two-track' input. It has unbalanced RCA phono and mini‑jack connectors, but there's also a Bluetooth receiver, which could be handy for band jamming/rehearsal sessions, streaming music to the PA at an event, or recording a click from a smartphone's metronome app (there are no metronome facilities onboard). This channel has no EQ and has access to only the first two aux sends.
The mic and instrument inputs can apply up to 50dB of gain, and the line inputs 40dB. Subjectively, I didn't notice the mic preamps imposing any undesirable sonic character, and while their maximum gain is nothing to write home about it will be plenty for typical close-miking applications. That said, none of the channels offer pad or polarity-invert switches. That's a shame, most obviously because a mixer-recorder with this many channels and preamps will inevitably appeal to people wanting to recording bands with a close-miked drum kit. Anyone recording both top and bottom snare mics, for example, would want at least one channel with a polarity-invert switch. For very loud sources, the preamp's lack of pad/minimum gain could also cause headaches. For example, when I close-miked a snare drum with a small-diaphragm condenser, even with the preamp gain turned right down most hits peaked very high, and the very loudest were distorting. So if I were planning to buy a Model 24 to record rock bands, I'd probably want to invest in some of those in-line pads that take the form of a short metal barrel with an XLR connector at each end — they're not expensive or heavy to lug around, but I'd rather have the facility built in (you can't magic them into existence if you suddenly discover you need them during a gig!). You might want to keep a couple of polarity-reversing XLR cables or adaptors handy too.
Another thing to note is that phantom power is global — it can be applied to all the mic preamps or to none. It would be asking a lot of a multi-purpose device at this price to have switchable phantom power for every channel, but I'd have preferred to see it switchable in two banks. That said, there are worse design trade-offs you could opt for when building to a price.
Sends, Groups & Master Section
The master section, control-room facilities and various outputs occupy the gold-coloured areas on the right, along with the screen and menu-navigation controls for the multitrack recorder and effects. Four faders in the bottom-right area set the level of the Sub, Mon 1, Mon 2 and Main busses. The stereo Sub bus has a L-R pair of outputs (dual balanced jacks) in the top right. A button next to the Sub fader passes the signal on to the Main bus and there's also a mute switch, but I was surprised to find no way to solo this Sub group — including that facility would have been inexpensive and would have made soloing, say, all your drum mics at once much quicker and easier. If that's a feature you'd miss, you could use a workaround: patch the Sub outputs into a stereo input channel (remembering not to route the Sub to the Main mix) and route that channel to the Main mix; solo this 'return' channel to solo what's routed through the Sub bus.
The next two faders are for the Mon 1 and Mon 2 busses, fed by the first two aux send knobs of the input channels. These busses each have a balanced mono TRS jack output, and thus allow you to route the signal to artists' headphone amps or outboard effects processors. There are no dedicated aux return channels, so if using these for effects rather than cue mixes you'll need to bring the returns back on one (or more) of the input channels. An AFL button adjacent to the fader sends the post-fader signal to the PFL/AFL master (solo) bus for monitoring via the control room and headphone out busses. These being mono busses, if you want to create stereo cue mixes, you'll need to send things in different amounts to both Mon 1 and Mon 2, and use their outputs to provide a stereo feed to a headphone amp — and of course you'd then have only one cue mix available.
The final fader is for the Main stereo mix bus, whose L-R signal is delivered to the outside world via the usual pair of balanced three-pin XLRs. This signal is routed pre the fader to the control-room and headphone outputs. While that's sometimes handy, being unable to monitor the post-fader signal in the control-room (ie. studio speakers) or headphone outputs caused me to become frustrated on occasion. It means, for example, that it's impossible to audition manual fade‑outs via your headphones or studio monitor speakers. And neither can you hear the effect of the seven-band graphic EQ (which can process the Main mix or Mon 1 signals, or be bypassed), since that processing is also applied after the main stereo mix fader.
To be fair, I suspect most people won't be using this mixer for manual fades or master-bus EQ in a studio context. The designers have obviously laid things out this way with live-sound applications in mind — the graphic EQ is intended for tweaking stage monitors and the front-of-house PA, where you'll be able to hear the result in the room. Still, call me old-fashioned, but I prefer to have the option of hearing in my studio speakers the sound at the very end of the signal path!
The Control Room bus has balanced outs on two TRS jacks, the level being governed by the Control Room knob, which you'll find below the screen and effects section. On either side of this are similar level knobs for the PFL/AFL Master and the quarter-inch jack headphone outputs. The PFL/AFL Master bus is routed to both the Control Room and phones every time any PFL or AFL button is pressed on a channel — this mutes the Main mix in these outputs and lights an LED adjacent to the screen to indicate that something is soloed. The only post-fader (AFL) solos are for Mon 1 and Mon 2; the rest are all pre-fader (PFL).
I was pleasantly surprised by just how loud the headphone output was. Playing commercial material through an input channel, I had to turn this only a tiny way to get a sensible level from my Sennheiser HD 650 headphones. The benefit of such a hefty headphone amp isn't that you can choose to deafen yourself, of course! Rather, it's that it allows you to work with lower-level signals when recording — when recording at 24-bit, you can leave plenty of headroom to avoid clipping without the noise-floor becoming problematic. The only shame is that there isn't a second headphone output and that, like the Control Room, you can only monitor the main mix pre-fader and pre-EQ.
One more thing I missed in the master section was a dedicated talkback facility, though you can of course use a mic on a spare input channel and send to Mon 1 or Mon 2.
Digital Effects
Above the bus faders and level knobs is the on-board digital effects section. There's a useful range of reverbs and delays here, as well as a chorus, a flanger and a few hybrid patches, for example combining reverb with chorus. All the effects are listed clearly on the top panel beneath the screen, and each has a single parameter that can be tweaked using the Multi Jog wheel (a rotary encoder that doubles up as a button), the screen and the function buttons immediately beneath it.
This effects engine receives a mono input (whatever's sent to it using the channels' aux 3 knobs) and delivers a stereo output. The output can be routed in different amounts to the mono Mon 1 and Mon 2 outputs and to the main stereo mix, using the three orange-capped knobs on the left of the effects area.
To use the effects, hit the effects section's Select button and the currently selected effect will appear on screen. Turn the Multi Jog to choose the effect you want, press it to select the effect's editable parameter, and turn again to change the effect parameter. Press again if you want to select a different effect, or press Menu to get you back to the main menu for the multitracker.
The effects sound decent enough, though there's nothing here I'd choose instead of my DAW plug-ins, and a reasonable-quality affordable hardware effects processor patched in to the FX output would also be an improvement. But what's here will certainly do the job well enough for cue-mix reverbs, demo mixes and small gigs. Delays and reverbs are obvious choices for global send effects, but I was a little confused by other choices — just how likely are you to want to use that flanger as a send effect? I suspect, therefore, that these effects come courtesy of an all-in-one effects chip .
Multitrack Recording
As I mentioned at the outset, in terms of functionality the on‑board multitrack recorder sits somewhere betweeen the Cymatic uTrack 24 and JoeCo Black Box Recorder stand‑alone multitrackers, given its individual track-arming and both footswitch-operated and automatic punch-in/out recording. To get started, you'll need your own SD, SD HC or SD XC card (Class 10 or higher), since not all SD cards are capable of recording/playing back 24 tracks of 24-bit, 48kHz audio simultaneously. A range of cards approved for use with the Model 24 is listed in the PDF manual, though if you do insert an incompatible SD card (they all have the same physical connection), an on-screen message helpfully informs you that it's not compatible. Put the right sort in (I used a Sandisk 16GB SD XC card) and you'll be prompted to create a SYS file. The Model 24 then creates a default song, and you're ready to record. That said, you'll want to set the song sample rate and word length first. This is all done in the Song menu, accessed using the Multi Jog, and here you can also view current song information, rename and delete songs, and protect/unprotect them. You can have up to 100 songs on a single SD card (that number only being otherwise limited by the capacity of the card). There's also a single-level undo/redo.
 All the on‑board digital functions are controlled by a very simple menu, navigated mostly using the Multi Jog wheel — a combined rotary encoder and push switch.For the channel you want to record, simply set its Mode input-source slide-switch to Dir or Mtr, press the channel's Rec button (above the Mute button) to arm the tracks, press the transport section's Record button, and off you go. You'll probably find you want to leave the slide-switch in the Mtr (Multitracker) position most of the time — with the switch set to Dir (Direct), the channel will always monitor the mic/line/instrument input, whereas with it set to Mtr, it will monitor the input while record-armed/recording, but the multitrack return when not record armed, and during playback.
Punching In
In terms of recording functions, there's not an awful lot more to explain — for the most part, you record-arm the track, hit record and the recorder records; press stop and it stops. You can also fast forward/rewind to different points in the song for recording/playback, and can set playback to loop for the length of the song. The only other operation you can perform (without resorting to using a computer) is to punch in over an existing recording. This is a destructive process which records the new part over the pre-recorded audio only while punch-in is engaged, and there are two ways to engage this. The first is to use a momentary footswitch (not supplied) plugged in to the footswitch jack input, which tells the recorder when to start and stop recording during playback. The second is an automatic punch-in, which you set using the Multi Jog. Press Menu, scroll to the Punch In sub‑menu, use the Multi Jog to select the punch‑in time, then press one of the function buttons to move the cursor to the punch‑out time, and scroll to set it. Another menu allows you to define a pre-roll time during which the multitracker will play back before punch-in recording occurs. The default setting is 2s but it can be anything up to 10s. Playback continues for a couple of seconds after punch out.
 On the rear panel, there's only a USB socket and switchable IEC AC power inlet for the built-in PSU.Some might see this all as being a touch Spartan in this day and age, while others will, I'm sure, welcome the refreshing old-school simplicity — it functions, to all intents and purposes, as an analogue mixer and a digital tape machine. I certainly lean towards the latter opinion, though there were still a few functional omissions that left me frustrated.
My biggest gripe is that there's no means to move recordings from one track to another without a computer. Yes, there are 22 tracks to record, but as there are no virtual takes and only two mixer channels with a high-impedance input, you can only capture two DI recordings per project unless you have an external DI box, so it's worth spelling out the workaround. You'll need a computer hooked up to the Model 24 via USB, or to an SD card reader. Use your file browser to find a recorded part and move it to another folder. Put the card back in the Model 24, and use the menu to import it to a different track. Of course, if you're bothering to use a computer, you might as well use the Model 24 as an audio interface! Hopefully this issue can be addressed in a future firmware update. It's possible to dream up all manner of other editing functions you might add to this device, but on the whole I'm very much in favour of retaining the tape-machine simplicity.
USB Audio Interface
Setting up the Model 24 as an audio interface is easy: it's a class-compliant Audio Unit device for Mac OS, and there's an ASIO/WDM driver for Windows. It was recognised straight away by my 2018 MacBook Pro (Mac OS 10.14.1) and my Cubase 9.5 Pro and Reaper v5.963 DAWs. As with the multitracker, the conversion can be 16- or 24-bit and 44.1 or 48 kHz. You can record up to 24 tracks including the main mix, and play back up to 22 tracks simultaneously. The manual explains that "you cannot use this unit's recording, playback and other recorder functions when it is connected to a computer by USB." Happily I found that to be incorrect; I was able to record to SD card and to Reaper via USB simultaneously, so there's a degree of redundancy there.
As with the multitracker, both the A-D and D-A conversion happen post the mic preamp, high-pass filter, insert-point and compressor — there's a nice, clear block diagram in the manual detailing all this, and another that spells out the maximum gain/attenuation at each point in the signal path. That's a sensible enough default position, but it does mean that you can't access the mixer's insert points or compressors while mixing, and that, unfortunately, you can't capture the results of every channel's EQ back to individual DAW tracks simultaneously — in other words, you can't use the compressors or EQ as 'hardware inserts' in your DAW.
It also means that, without some ad hoc physical patching of outputs back to inputs, the onboard effects section can only be recorded via the Main mix channels. So if, for example, you wanted to print the sound of a DI guitar running through the effects engine's flanger or chorus, you'd have to plug the guitar into channel 1 or 2, send that to the effects engine via aux 3, route the effects to the main mix, and record that — and not have anything else routed through the main mix while you did so. It's not the most intuitive work flow, so most people will prefer to use plug-ins when using the Model 24 as an audio interface.
The plus side of the conversion happening pre-EQ, of course, is that you can both mix and record a live show, with the EQ and sends being used for front-of-house duties, but the recordings being captured without any of your EQ, mutes or fader moves. You can also record the main mix without the graphic EQ (for the stage monitors or PA) being printed. Thought of in this context, the Model 24 does make more sense.
No Hardware?
While this is indeed a 24-input, 22-output interface, there are not that many physical analogue outputs on this desk, and there are therefore few options when it comes to routing signals out of the mixer to external hardware. In fact, post the USB/multitracker playback returns, the only available outputs are: the Mon 1 and 2 mono outs, the Sub group stereo output, the effects send mono out, the stereo Control Room, stereo headphones and stereo main mix output. Three stereo output pairs are always otherwise engaged, so that leaves only a few outputs via which, with a little creative thinking, you could route individual sources to external hardware — and that's assuming that you don't also want to use the on‑board effects.
The only other two outputs are the insert sends on channels 1 and 2. But as I said earlier, these come before the A-D/D-A converter, making it impossible to use these to process playback signals. Could the designers have considered a different signal flow on these channels, to allow access to their inserts and compressors on playback?
Verdict
I've found the Model 24 rather tricky to review — it has genuinely both impressed and frustrated me. It's a wonderfully simple device, and anyone who has ever used an analogue mixer or audio interface before will be able to get up and running very swiftly indeed. It also does the basics that most people will want. On the live-show side of things, you can record the sources unprocessed (or slightly compressed) while mixing for front-of-house and stage monitors, and you can take those recordings back to the studio for more detailed post-production work on the computer. In the studio just the simple fact of having 16 mic preamps, 12 tracking compressors and basic analogue control-room facilities goes a long way to justifying the price tag, before you consider any of the other functions. You could easily capture a full rock band, and there's true zero-latency monitoring for artists. You will probably want to add external headphone amps for larger band setups, though I found that the Mon outputs could drive my headphones directly. The fact that you can leave mics and instruments plugged in, switch on the mixer and be ready to track in a matter of seconds should also appeal to songwriters wanting to get ideas down quickly.
All in all, then, there's a lot to like. But because of the inevitable limitations of a device trying to do so much at this price, prospective purchasers will want to be sure it meets their needs. Some of the issues I've discussed can be solved easily and affordably with additional products — mic pads, polarity inversion, and headphone amps, for instance. Others less so, such as the inability to move recorded tracks without hooking up a computer, and the inability to process DAW recordings with the analogue compression and EQ or hardware hooked up to the insert points.
Though I can't think of any directly comparable products in terms of approach and functionality, one device obviously aims to meet the needs of a similar group of users — the Zoom LiveTrak L‑20, which Sam Inglis reviewed in SOS Jan 2019 (https://sosm.ag/zoom-livetrak-l20). This also offers 16 mic preamps and at about a third of the weight is easier to take out on location. As you might expect of a digital mixer, it boasts greater functionality. For example, there are more cue mixes, more headphone outputs, two effects engines and useful features such as polarity inversion. That said, the Model 24 offers more compressors and two additional recording channels. Check out Sam's L‑20 review if you'd like to make a more detailed assessment of the relative pros and cons of these devices, but while the same people might want to consider these products, I think each will appeal to different people. The L‑20 lacks the analogue charm and immediacy of the Tascam, with its knob-per-function layout and tape-like simplicity. I mean, how quickly can you tweak the EQ of a bunch of drum tracks on the Zoom? I guarantee I could do it more quickly on the Tascam, and be able to see what I'd done by glancing at the channel strips. The 100mm channel faders of the Model 24 are also, to me at least, much nicer to use than the shorter ones of the Zoom. In short, when it comes to mixdown, it feels like a mixer, even if it lacks some facilities you'd find on a traditional analogue console. And I love that the digital side of the Model 24 is just as intuitive and accessible as the analogue parts.
While I do have a few small reservations, the Model 24 offers more than enough for the asking price, and for some users it will absolutely hit the mark.
Alternatives
The two other products which will most likely hold appeal for the same sort of user as the Tascam Model 24 are the Zoom LiveTrak L‑20 and the Soundcraft Signature 22 MTK. The former boasts greater functionality and portability but doesn't offer the analogue compression and EQ, while the latter is an analogue mixer and audio interface but lacks the Model 24's built-in digital multitrack recorder.
Tempo Tantrum!
I can forgive the lack of MIDI facilities on this device — that's just not what it's trying to be. But one thing that I think would be a particularly useful addition is a metronome facility. I can't think that this would have added a huge amount to the cost (handheld digital metronomes are available for the price of a couple of pints), but it would be enormously helpful to be able to route a metronome signal to an artist's headphones when working without a computer. I know not everyone wants to be tied to a click every time they record, but having the option is nice! As it is, there are only two ways to get a metronome signal into the Model 24 — either record one as audio, or import a pre-recorded audio file. I found that I preferred to record it in, since I could be sure it would match the length of the song, though importing is obviously quicker. This is one scenario in which the Bluetooth receiver proved useful — there are loads of capable free metronome apps for iOS and Android that can send audio to the Model 24 in this way.
Pros
- Looks great, feels well built and most facilities are very intuitive.
- 22-track computerless recording, and 24-input USB audio interface.
- Auto and footswitch-controlled punch‑in/out with pre-roll.
- 12 analogue compressors.
- Three aux sends.
- Some useful reverbs.
- Competitively priced.
Cons
- Can't print the EQs
- Can't mix through the compressors.
- Multitrack recordings can't be assigned to other tracks without a computer.
- No pads, polarity inversion or talkback.
Summary
The Model 24 will meet the needs of a lot of people who want to record their gigs, and it offers plenty for the money in the home studio too. At this price, though, there are inevitably some routing limitations.
information
$999.99.