
If vintage samplers butter your muffin, Isla Instruments have got a full afternoon tea for you.
The legendary E‑mu SP‑1200 sampler was released in 1987. It boasted a whopping 384 kilobytes of sample RAM which offered about 10 seconds of sampling time. It was a successful product, but should have faded into irrelevance during the late 1990s when computers were widely adopted and hardware samplers were abandoned en masse. However, something about the SP‑1200 endured. In the 35 years since its release, it has become a classic. Hip‑hop and house producers have clung to it for its intuitive workflow and chunky, lo‑fi sound.
Isla Instruments, a seemingly unlikely champion given that their only other product to date is a small MIDI controller (the Kordbot, which I reviewed in September 2018), have taken the SP‑1200 as inspiration for their latest product, the S2400. It is a spiritual successor, taking the revered sonic characteristics and workflow as a starting point and adding modern conveniences that the OG could only dream about.
Sampling The Delights
Out of the box, the S2400 is reassuringly weighty. It’s on the large size for a desktop drum machine, measuring 46 x 31 x 13 cm. It is nice to see some space on a front panel during a time when machines are shrinking ever smaller. With a steel enclosure, aluminium panel‑mounted knobs, smart aluminium side‑panels (wood is available as an extra), and heavy‑duty mixing desk‑style faders, the overall first impression is one of very high standards.
Like the SP‑1200 before it, everything revolves around eight ‘channels’. There are eight MPC‑like velocity‑sensitive pads, eight 60mm faders, and eight dual rotary pots. Scattered around are buttons to change fader modes and access features like sampling, the sequencer, disk operations, etc. On the right is a 128 × 64 pixel OLED display which is navigated using a large clickable data‑entry encoder or the number‑pads below it, which double up as context‑sensitive shortcut buttons for various functions.
In true sampler tradition, the S2400 boots up with empty memory for you to fill. The internal 128MB flash drive holds a few factory kits and samples to get you started. Alternatively, you could fill an SD card and load files from there. Only WAV files are supported and must be 26, 44.1, or 48 kHz and 16‑, 24‑, or 32‑bit. Or you can dive straight in and start sampling.
64MB of sample RAM is available, which equates to 11m 39s of mono 48kHz recording or 21m 30s of mono 26kHz recording. Stereo recording is also available and will take up twice the space. The 26kHz option is significant because it uses hardware anti‑aliasing filters which play a part in the classic SP‑1200 sonic signature. Samples recorded at 26kHz are 12‑bit and samples recorded at 48kHz are 16‑bit.
64MB of sample RAM is available, which equates to 11m 39s of mono 48kHz recording or 21m 30s of mono 26kHz recording.
Sampling can happen from several sources including the two stereo phono inputs or the two stereo quarter‑inch line inputs. Only the first pair of each has the 26kHz anti‑aliasing filter, leaving the last pair locked to 48kHz. Sampling is either manually started, or triggered at a certain signal threshold.
After sampling, the ‘sample analysis’ screen will confirm that your sample is OK — or not if it’s clipped or empty for some reason. Then you are presented with a sample editor where you can trim, normalise and save, either to the current project folder or elsewhere on your SD card. You can also assign the sample to a Track at the same time.
There are four banks of eight Tracks available per project. A single sample can be assigned to each Track meaning each project can contain up to 32 samples (24 if you’re using Live Loops — more on that later). Each Track is assigned to a Channel, of which there are eight.
Channels are like voices on a synthesizer. A Channel can play a single mono or stereo sample at any given time. So despite having 32 Tracks, you can only play eight of them at once. The SP‑1200 had the same eight‑channel limit and it’s a shame that Isla Instruments couldn’t bump this number up on the S2400 as it does feel a bit modest by modern standards.
Fader Modes
Once a sample is assigned to a Track it can be triggered by the pad associated with that track. The pads feel great. Velocity sensitivity is excellent (although can be disabled if required), and one nice touch is that they can be assigned different colours thanks to a small transparent window in each pad with a multi‑colour LED beneath it.
The faders above each pad do a variety of tasks depending on which Fader Mode is active. The buttons down the left side of the faders choose the Mode. With no Fader Mode active the faders adjust the level of the playback for that track. These values are only for performance and are not written into the sequencer data like the other fader modes. It allows you to perform level changes whilst a pattern plays back.
Level Mode might sound like it’s doing the same thing. But it sets a level that does get written into the sequence when you record. As such you can program volume variations into a pattern using Level mode, and then adjust the overall volume using the default Mixer mode.
Pitch Mode unsurprisingly allows you to set the pitch of the sample. There are several options to choose from which alter the way the faders quantise pitch, including two modes that precisely emulate the SP‑1200. New modes include chromatic, major/minor scales, and a fine mode. The total potential pitch range is 40 semitones (20 in either direction). There is a setting called ‘Audio Engine’ which governs how the pitch‑shifting sounds. In ‘classic’ mode, the now legendary ‘ringing’ (aliasing) can be heard when transposing a sound away from its natural pitch. For those that prefer a cleaner sound, there’s a ‘HiFi’ mode which is blissfully clear of aliasing.
...the now legendary ‘ringing’ (aliasing) can be heard when transposing a sound away from its natural pitch. For those that prefer a cleaner sound, there’s a ‘HiFi’ mode which is blissfully clear of aliasing.
Envelope Mode allows you access to the three internal envelopes. Again here we find a ‘classic’ mode that uses the exact 8‑bit aliased volume envelope of the SP‑1200. That envelope came with some less desirable zipper artefacts when using short release times, so there’s a HiFi mode here too. If you’re in classic mode, you have three envelopes, the classic one for volume and two additional envelopes for pitch and filter. If you choose not to use the 8‑bit envelope, you are left with the two HiFi envelopes, the first of which gets assigned to amplitude control.
Loop/Slice mode is where you can trim, loop, normalise or slice your sample. The faders will edit sample start for each of the eight pads in the current bank and the rotary knob will take care of the endpoint. Each channel has an A and B button just below the rotary pots. These perform varying tasks like opening the settings page for that Fader mode. In Loop/Slice mode, hitting the A button will open up the waveform editor where you can zoom in and out, snap to zero crossings, normalise and reverse slices.
Each of the fader modes I’ve described — Level, Pitch, Envelope and Loop/Slice — can function in a simultaneous ‘Multi‑mode’. Multi‑mode allows the eight pads to hold different values for the current track. So, in Level multi‑mode, you can set eight different volumes and perform with those, recording them into the pattern if needed. Similarly, eight different pitches, envelopes and slices can also be set.
The Multi‑mode Slice will be of particular interest to anyone making hip‑hop, jungle or any other genre that relies heavily on slicing up audio because it allows you to set multiple start and end points, and loops for a single sample. No need to copy and paste samples and waste valuable RAM.
You can combine these multi‑modes if desired by enabling ‘Multi‑mode‑sync’. When enabled, Faders modes remain active even when you switch modes. So you can have eight pads, each with different level, pitch, envelope, slice, loop and filter values.
 The S2400 measures 460 x 310 x 130 mm and weighs in at a hefty 6kg.
Filters
Speaking of which, the S2400 is blessed with both analogue and digital filters. The analogue filters you may see referred to in marketing are part of the circuitry inherited from the SP‑1200 design. They aren’t tweakable in software other than to turn them on or off, plus they are tied to specific audio outputs. Channels 1 and 2 have dynamic filters which respond to audio level with a simple decay envelope to adjust the frequency slightly. Channels 3‑6 have fixed filters, each of which has a slightly higher frequency cutoff than the previous one. Channels 7 and 8 have no analogue filters. The purpose of these filters in the original SP‑1200 design was to alleviate the digital aliasing, but they’ve become regarded as an essential part of the sonic signature and so Isla Instruments decided to keep them with the option to bypass if required.
The digital filters are much more useful. Each track has a resonant filter capable of low‑, band‑ and high‑pass modes. Whilst they don’t self‑resonate (shame as I’m sure that would have resulted in some fine kick drums), they do sound excellent. Filter mode, frequency and resonance can be set in Multi‑mode, so it’s easy to record filter movement into a pattern. You can also tweak them live whilst a pattern plays using Override mode (more on that shortly).
Sequencing
After all this sampling and looping comes the fun of sequencing patterns and songs. Each project can hold 100 patterns up to 99 bars in length and each pattern can be a different time signature. The sequencer runs at 96ppqn.
There are several ways to fill a pattern, the most obvious being hitting record and playing the pads as the pattern loops. Notes are recorded into the patterns with the current settings dictated by the fader modes, plus multi‑mode if enabled. That means you can move the faders whilst you play and the pattern will play back whatever value was present at the trigger point of each note (automation during a note is not recorded into the sequencer). Quantise is always active and can be set per track or globally with choices ranging from 1/4 to 1/256T, which is as close to unquantised as you can get.
 Step Program mode shows your pattern on the 128x64‑pixel, monochrome, OLED display where you can add, delete and edit each step.Once your masterpiece is recorded, Step Program shows a graphical representation of the pattern on the screen and allows you to move around inserting and deleting steps. Any step can be opened up for detailed editing which includes adjustment of all Fader mode values and filter settings. TR Mode repurposes the mute/solo buttons above each pad as 16‑step inputs for easy X0X‑style programming. Swing can be applied after recording and happens non‑destructively with a choice of either 16th or eighth note (with eighth as the default). You can apply swing either globally or per track, which is a nice touch.
Another way to edit patterns is using the override functions. Enabling playback override will ignore the pattern values and simply use the current fader value, allowing you to perform live tweaks whilst the pattern plays. If you wish you can also record these adjustments into the pattern, replacing the previously recorded values.
Song Mode
Every project can contain up to 100 songs. At its core, a song is a playlist of patterns that can be arranged in any order. Other commands can also be inserted into the playlist, such as repeats, tempo changes, mutes, solos and even other songs.
For example, using the repeat command, you might repeat a chorus or verse section that is made up of multiple patterns, but which repeats as a whole. Your chorus might be made from patterns 5, 6, 5 and 8 which can then be repeated as many times as necessary. Mute and solo commands can also be inserted allowing you to re‑use the same patterns by simply silencing certain tracks. Tempo changes can be done relatively (+5bpm) or absolutely (154bpm). Finally, and perhaps most impressive of all, complete songs can also be inserted into other songs, which I found to be an excellent way to work on song sections without getting bogged down in a huge playlist of patterns.
Live Looping
As if it didn’t do enough already, the S2400 can be used as an 8‑track looper device. Once Live Looping is enabled, Bank D becomes reserved for loops (any samples previously assigned there will no longer be accessible). Banks A‑C behave as normal and live looping can be combined with normal sequencing without worrying about channels or polyphony.
Once enabled, the process of looping is devilishly simple. Whatever input is currently set in the Audio Monitoring section will be recorded to the active channel. Pressing a Pad in Bank D will either select that channel or if it’s already selected, toggle recording. Hitting another Pad whilst recording will immediately start recording into that channel. Recording goes into a temporary buffer area which can then be committed to the Live Loop or discarded, which is a clever way to allow some level of undo before you overdub into the loop.
Loops can be up to 19.4 seconds long, always in mono. This equates to up to eight measures in 4/4 time at 100bpm or faster. The loops are played in time with the current pattern and can be set to be a fraction of the pattern’s length allowing for different length loops. Once recorded, loops will continue to play over all patterns unless muted and you can adjust the level with the faders and filter settings with the dual knobs.
Live Loops are automatically saved as part of the current project, or you can manually save them as samples and assign them to Pads if further slicing and dicing is required. Interestingly, Live Loops can be assigned to any physical hardware output, not something you can do with normal samples. For example, you can assign all eight live loops to one output if desired, and no choking will occur (although you might get some clipping if you’re not careful with levels). Overall, Live Looping is incredibly fun and the fact that it doesn’t use up sample polyphony makes it genuinely useful. It’s a great way to get an extra eight voices from a project.
In Use
The S2400 has a specific workflow. If, like me, you are used to the Akai MPC way of things, adapting to the S2400 can take some lateral thinking. Firstly, having a maximum of eight channels (voices) requires a level of planning and decision‑making. Careful assignment of channel numbers is essential to prevent samples from choking each other and running out of polyphony. Old‑school evangelists will say that limitations inspire creativity and I certainly won’t argue with that, but I found myself running up against the eight‑voice limit more often than I would have liked.
The other aspect I struggled with was the rigid configuration of the separate audio outputs. I like to have spare outputs permanently wired into the studio’s patchbay but having a cable plugged into any of the S2400’s individual outputs automatically removes that channel’s signal from the mix output. Also, each output is tied to its channel number. Channel 1 always goes to individual output 1, Channel 2 to output 2, etc. You can’t freely assign a sample to any output (like you can with Live Loops). For me, this made the individual outputs difficult to use. You either have to have individual outputs permanently in use (with dedicated mixer channels), or you accept constantly plugging and unplugging cables. An internal digital mixer that allows you to send multiple channels to one or more outputs would be very welcome.
The aesthetic design of the S2400 is gorgeous. The weight, size, faders, buttons, pads and encoders embody that old‑school approach of building things to last. There’s no plastic here, no wobbly pots and no flimsy connectors. It’s a joy to touch and use.
One aspect of the SP‑1200 which Isla Instruments wanted to preserve was how muscle memory plays an important role in everyday use. When you want to record a new sample, you always click the same sequence of buttons to get there. This is an aspect of hardware instruments that can end up neglected when touchscreens and menus become the norm. Isla Instruments have succeeded, although there are many more functions to remember, especially with the F‑key shortcuts, than in the original SP‑1200, so it might take a little longer to fully commit to memory.
The sound quality is superb. “It don’t mean a thing if it ain’t got that ring” is a refrain I’ve come across when discussing the sound of the SP‑1200 (the ‘ring’ being the SP‑1200’s aliasing). If you want it, it’s there. But for me, a lot of the magic seems to lie in the internal analogue summing. Once you start mixing a few different samples, there is a glue that gels everything together in a very pleasing way. This is evident even when all channels are in HiFi mode (so no aliasing). This might sound crazy but, to me, the internal summing has a ‘big console’ kind of sound, and there’s plenty of bottom end for those booming 808 kick samples.
As a standalone beat‑making machine, it’s near perfect, especially for the old‑school workflow.
Above all, I think the S2400 is just plain old‑school fun. It’s hugely satisfying to sample, slice, sequence and repeat. The S2400 is flexible enough to cover different roles within the studio. As a standalone beat‑making machine, it’s near perfect, especially for the old‑school workflow. With the built‑in USB audio interface, it can also function as an interface and character box — dumping samples to and from your DAW to warm them up using the S2400’s resampling feature. Or if you already have your dream sequencer, the S2400 makes a great sound module because the MIDI spec is flexible enough to give you direct control over everything you might need.
According to the feedback from online forums and Facebook groups, the S2400 is already a hit with hip‑hop producers and it is not difficult to see why. It nails the old‑school workflow and sound. At the same time, it brings many conveniences and modern features. As someone who cut their teeth on hardware samplers in the 1990s, I wholeheartedly approve. If you make sample‑based music, you’re going to love the S2400.
Round The Back
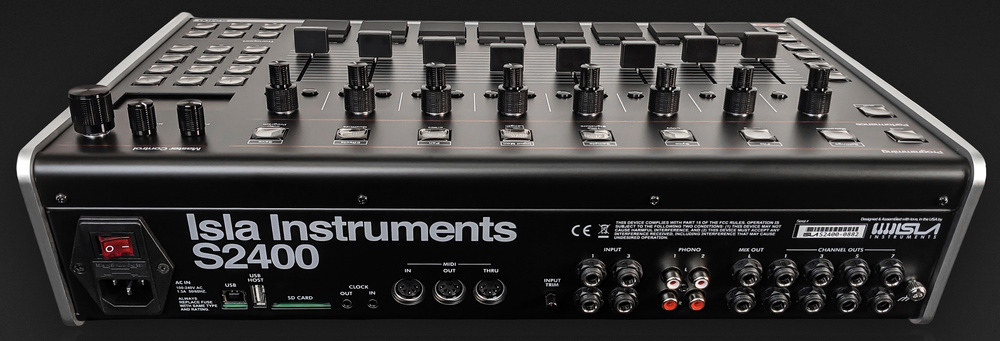
Along with the IEC socket for the internal 100‑250 V AC power supply (bravo Isla), you’ll find 10 audio outputs on pseudo‑balanced quarter‑inch TRS, two stereo phono/line inputs, four audio inputs on pseudo‑balanced quarter‑inch TRS, MIDI In, Out and Thru on 5‑pin DIN, analogue clock in and out, USB 2.0 device port (for MIDI and audio), USB host port (for MIDI controllers or USB peripherals) and an SD card slot which can read cards up to 1TB. On the front of the unit is a single stereo headphone output.
What’s In That Grit?
Why exactly would anyone want to recreate 35‑year‑old sampling technology? It seems there is an inherent sound to the converters, preamps, filters and even pitch‑shifting algorithms used at the time. Just in the same way that vintage synths are adored and celebrated, so too are some digital samplers.
The key aspects of the Emu SP‑1200 sound revolve around the 26.04kHz, 12‑bit sample rate which sounded crunchy and lofi. Furthermore, when you pitch‑shifted sounds away from their natural pitch, aliasing was introduced. To try and mitigate this (for aliasing was not considered desirable at the time), E‑mu put analogue, fixed‑frequency, low‑pass filters over some of the audio inputs and outputs. The cumulative effect of analogue filters, digital bit‑depths and the pitch‑shift aliasing combined to create some kind of magic.
Hip‑hop producers who were sampling vinyl would do so with the vinyl sped up to 45rpm. They would then pitch the sample down in the sampler to bring it back to normal speed. This would save precious RAM, but had the rather cool side‑effect of adding even more lo‑fi grit. This has become such a legendary workflow that Isla Instruments have put in a function to automatically resample any audio through the input filters, with an additional option to pitch the audio to mimic the 33/45rpm trick. Very cool!
MIDI Sequencing
Isla Instruments are regularly releasing OS updates with bug fixes and new features. One feature which hadn’t quite made it in time for this review is MIDI sequencing. It’s already in progress and should be in beta by the time you read this review. As I understand it, four new Banks will be available which will allow 32 tracks of dedicated MIDI sequencing via either the MIDI DIN or USB outputs. Something akin to the step editor will be available but with a piano roll for editing and the faders and pots will be able to send MIDI CCs, so you can use the S2400 to tweak your external synths and samplers as your song plays. Combining external synths for polyphonic chord tracks with the internal sampler tracks, and the live looper should be a lot of fun.
USB Audio
The USB Type‑B jack on the rear of the S2400 can be connected to a computer to access the digital audio interface. The S2400 supplies 10 inputs to the computer, two for the mix outputs and eight for the separate outputs. The two computer outputs can be used to send a stereo signal to the Audio Monitor section and Sampler which should make sampling YouTube videos a breeze. Essentially, the S2400 can be used as a fully fledged soundcard supporting 48kHz, 16‑bit audio. It is a class‑compliant device and, although it wasn’t available at the time of review, Isla Instruments tell me they are working on an ASIO driver for PC.
F‑Keys
 Directly below the 128x64 pixel OLED display is a numeric keypad which, aside from allowing you to type in precise numerical values, doubles up as nine function keys to be used for functions that don’t have a dedicated button. What functions are assigned to each key depends on where you are at the time. For example, in the Loop/Slice Waveform Editor there are functions to zoom in and out, move to zero crossings, reverse the audio, etc. In the Browser screen, they become functions for file management, making and deleting folders, renaming and so on.
There are enough of these context‑sensitive functions to make printing them all on the front panel impossible, but thankfully the Help key will always show you a complete list of the functions for the current mode.
Alternatives
If the sound of that delicious ’80s aliasing is important to you, you might want to look at the Rossum Electro‑Music Assimil8or. At first glance, it’s not much like the S2400, being a Eurorack module. However it is made by Dave Rossum, who designed the SP‑1200, and it’s an eight‑channel sampler capable of that same aliased sound (optional). However, it has no sequencer, or filters, or MIDI, or USB, or phono inputs. Rossum also make a ‘35th Anniversary’ SP‑1200‑ a brand‑new SP‑1200 — which is almost an exact remake of the original, even down to the floppy disk drive. But there’s a waiting list of unknown length and it’ll cost you a cool $7500.
Pros
- That old‑school sound and workflow.
- Full 10‑in/2‑out soundcard built in.
- Choice of classic 12‑bit or modern 24‑bit sound.
- Beautiful build quality.
- Plenty of audio inputs and outputs.
Cons
- Only eight channels/voices.
- Individual outputs not freely assignable.
Summary
The S2400 is the first modern sampler I can think of which truly embodies the workflow and sound quality of ’80s samplers. For some, this will be pure heaven whilst others will wonder why on earth you’d ever want to return. But those sceptics could be convinced by the S2400’s updated features, beautiful build quality, and rock‑solid sound.