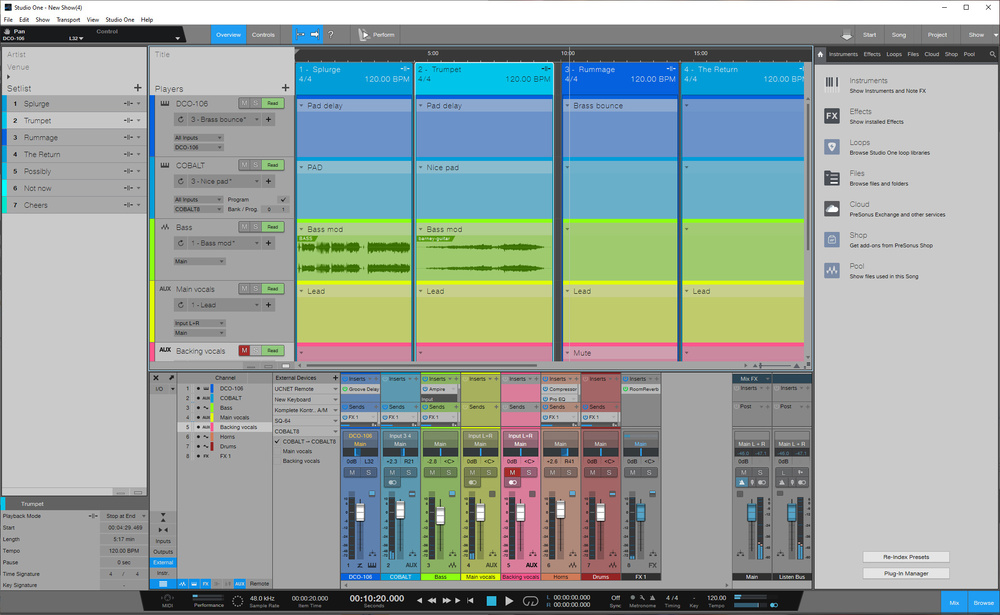
The Show Page is designed for live performance, and combines the roles of virtual instrument host, mixer and backing‑track player.
With Studio One, PreSonus have endeavoured to provide you with the tools to take your music from conception through to delivery with the Song and Project Pages. With version 5 they have a whole new destination for your music. The Show Page takes your songs, tracks, and projects on the road and into the realm of live performance. It’s similar to performing platforms like Main Page, Forte and Gig Performer, but comes with a fresh take on managing your set and some very useful integration with Studio One. You can create setlists with all your tracks, players, singers and instruments, both virtual and external, all mixed, controlled, and ready to play live. You can step out onto that stage with your gig sorted and your sound ready to go.
The Basics
The Show Page looks and feels like a stripped‑down version of Studio One. You have your browser on the right, the mixing console, and what look like tracks on an arrange page. It’s a familiar space that helps you get to grips with it fast. I should stress that this is a performance tool and not a creation tool: this is not where you write tracks or produce music so you won’t find an editor or sequencer here.
So, thinking with your gig head on, you don’t add tracks, you add Players. A Player can be one of four things hidden behind three options; you can select Backing Track, Real Instrument, or Virtual Instrument.
Backing Tracks are audio tracks. Now I’m old school enough to remember when backing tracks were MIDI files but in the Show Page, Backing Tracks are all about audio. It could be an entire mix that you’re singing along to, or it could be just a recording of a single instrument or stem. You can have as many as you like so you can have your whole pre‑recorded band laid out if you wish. This is not a place for editing, so if you are using individual tracks for bass, drums, guitar etc, then they need to have the same start point to play in time together. You can’t arrange your tracks in time in the Show Page; it’s assuming that these tracks are ready for playing. Tracks or mixes from your Studio One songs can be directly imported as Backing Tracks in the Show Page, using the Add to Show option.
Real Instruments refers to anything that’s played live that you want to route through your system. This would most likely be microphones for vocals, guitars, bass, and acoustic instruments. You could use it for hardware synths, but there’s a better option for that, particularly if they have MIDI, in the Virtual Instrument section. Adding a Real Instrument creates an Aux channel in the mixer where you can specify the physical input. When playing live you’d typically expect your vocals and live instruments to route directly through the house desk, but there are good reasons to route through the Show Page first. The Show Page mixer has access to all the plug‑ins and processors of Studio One, meaning that you can add effects and processing chains to every input. You could use Ampire on the guitar or add delay to your voice, or use the same plug‑in chain you used in creating the original recording of the song. The sound engineer might not thank you for the stereo output you give them to play with, but it will ensure that your sound is consistent from studio to stage.
Virtual Instrument Players are your software synths. Any installed synths and instruments can be loaded, played live, and incorporated into your gig. Bear in mind that if you are moving from your studio computer to a laptop for a gig then you’ll need to make sure all your instruments and library are installed on your mobile machine. This is also not about MIDI or running sequences; if you want an instrument to play something pre‑recorded, then it will have to be as an audio track. So, the Virtual Instrument option assumes you will be playing it live and behaves accordingly.
 You can assign physical MIDI controllers to any parameter you want to adjust live, in the Controls section.
Since the 5.1 update you can now also use External Instruments, which you set up in the External Devices window. It’s a bit convoluted, but this is where you can specify the MIDI connections of an external synthesizer or sound module and create an External Instrument container for it, which can be dragged into songs from the browser just like a virtual instrument plug‑in. You can also allocate an auxiliary channel to the External Instrument via the External Instruments column in the mixer and save it as part of the same container. Next time you drag the instrument into a song or Show it will create both a MIDI track and an auxiliary channel for the audio in the mixer. Once you get the hang of the steps involved it makes using external synths in Studio One a total breeze, assuming your MIDI instrument stays connected to the same ports.
So, that’s your band, your instruments, and your backing tracks set up as Players. There are some interesting things we can do with those but first, let’s create our Setlist.
Setlist
If you’ve dragged in some backing tracks then they would have automatically created a setlist for you because it will assume each backing track runs for the duration of a song. Each song in your set appears as a block in the timeline and in the Setlist on the left. If you have no auto‑generated songs from backing tracks then you can add them manually using the big + button. In the Setlist you can give them a name and set what happens at the end of the song. Your options are ‘Stop at end’, so you can soak up the applause and chat to the audience before carrying on; ‘Continue’ to get straight on with the next one; or ‘Loop’, which starts the sng again. You could potentially split the song up so that it loops just the chorus at the end until you choose to stop.
There are some other options hidden away at the bottom of the Setlist column, where you can set a start time, how long the song is, add a time signature, tempo, and key signature. These are mostly just for reference, although you do have a functioning metronome, and so any tempo information you provide will be used to drive the click. You can also add a Pause, which is a gap at the end of a song to give some space before continuing to the next one.
You can rearrange your Setlist any way you like, and you can also do this in the timeline by dragging the song headers about, as well as dragging the length of each song.
Patches
Back to the special features of the Players. The Show Page uses a Patch system of setting up what’s happening on each player track for each song. It’s like taking a snapshot of everything that’s loaded and inserted so that the right things are recalled for each song. For every Player the Patch recalls whatever plug‑ins are loaded in the mixer, and for Virtual Instrument tracks it also recalls the presets of the software synths. It can do this too for External Instruments if they respond to Program Change and Bank Change messages. Then for each song there’s a drop‑down arrow where you can select the Patch relevant to that song.
In other words, as you get to each song all the effects, synth presets and mixer settings are loaded for you automatically.
If you’ve got a MIDI controller, you can map physical controls to the things you want to control live.
Controls
The last section of the Show Page is about controls and the Perform screen. Hit the Controls button at the top and you’ll see a window where you can allocate a range of 24 knobs, faders and buttons to any available parameter in your gig. Maybe you want to be able to control some specific levels, or some effects, or the filter cutoff of your virtual synth — whatever needs hands‑on control in your gig, you can specify it here. You can use different configurations of all knobs or all faders, or a combination.
 Hit the Perform button, and you’re ready to start your gig. The GUI changes to this high‑contrast view, and hides everything except your assigned controls and setlist.
Once that’s set up, hit the Perform button and everything goes away except for those controls and your setlist. It initially feels like you’ve lost control over how your gig is playing out but the reality should be that you know your gig, you know your parts and it’s time to stop fiddling. Everything you need is right there; it’s all on black with great colour contrast so you can see if it perfectly in the chaos of the stage without it glaring at you. If you’ve got a MIDI controller, you can map physical controls to the things you want to control live. It’s also very touchable for those with a touchscreen.The Show Page is quite brilliant. It’s well thought out and accomplishes exactly what PreSonus intended. Personally, I think it would also make for a great live studio manager for creating a live environment for all our external gear, and for me, all it’s lacking is the ability to record the output of everything that’s going through it. However, PreSonus says that there’s a lot more coming to the Show Page soon...


